15 Mar
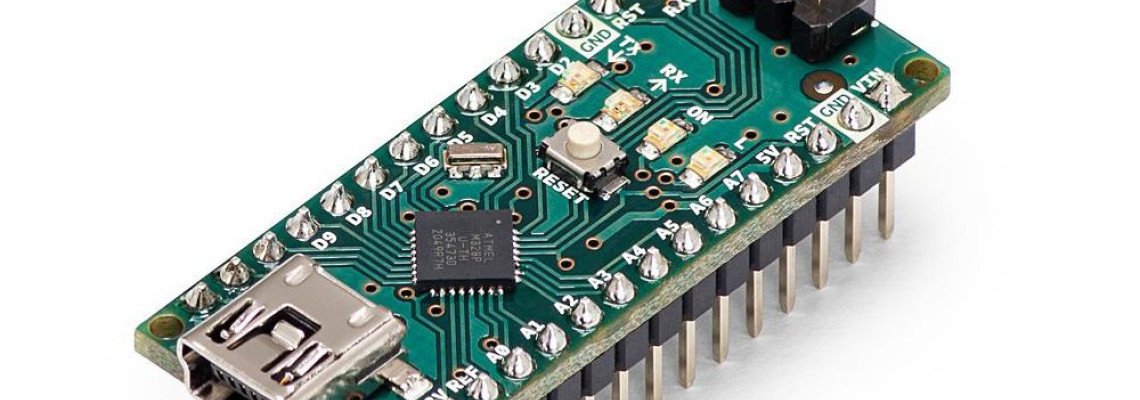

C'est Quoi Un Arduino nano :
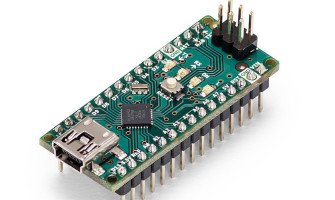
Un Arduino Nano est une petite carte microcontrôleur polyvalente qui fait partie de la famille Arduino. Il est similaire à l'Arduino Uno mais se présente dans un format plus petit, ce qui le rend adapté aux projets avec des exigences d'espace limitées. Le Nano est équipé d'un microcontrôleur Atmega328, possède des broches numériques et analogiques pour l'interfaçage avec des capteurs, actionneurs et autres composants électroniques, et peut être programmé à l'aide de l'IDE Arduino.
Application de l'Arduino Nano:
- Prototypage et Projets DIY : L'Arduino Nano est largement utilisé pour le prototypage et la construction de divers projets à faire soi-même (DIY), y compris les systèmes d'automatisation domestique, les gadgets intelligents et les jouets électroniques.
- Robotique : L'Arduino Nano est adapté pour contrôler des projets robotiques tels que les petites voitures robotiques, les bras robotiques et les drones en raison de sa taille compacte et de ses capacités polyvalentes.
- Interfaçage de Capteurs : Il peut interagir avec divers capteurs tels que les capteurs de température, d'humidité, de mouvement et de distance, ce qui en fait un choix idéal pour les applications de surveillance et de collecte de données.
- IoT (Internet des Objets) : L'Arduino Nano peut être utilisé pour construire des appareils IoT pour la surveillance à distance et le contrôle des appareils électroménagers, la surveillance environnementale et les applications domotiques intelligentes.
- Technologie Vestimentaire : Sa petite taille et sa faible consommation d'énergie le rendent adapté aux projets de technologie vestimentaire tels que les trackers de fitness, les montres intelligentes et les appareils de suivi de la santé.
- Éducation et Apprentissage : L'Arduino Nano est largement utilisé dans les environnements éducatifs pour enseigner l'électronique, la programmation et la robotique en raison de sa simplicité, de son coût abordable et de ses nombreuses ressources en ligne.
- Contrôle de l'Éclairage : Il peut être utilisé pour contrôler les systèmes d'éclairage LED, à la fois à des fins décoratives et d'applications fonctionnelles telles que les systèmes d'éclairage automatisés.
- Enregistrement de Données : L'Arduino Nano peut enregistrer des données provenant de différents capteurs et les stocker sur une carte SD ou les transmettre sans fil pour analyse et visualisation.
- Projets d'Automatisation : Il peut automatiser diverses tâches telles que le contrôle des moteurs, des actionneurs et des interrupteurs dans les projets d'automatisation domestique, l'automatisation agricole et l'automatisation industrielle.
- Projets Artistiques : L'Arduino Nano peut être utilisé dans des installations artistiques interactives, des sculptures cinétiques et d'autres projets créatifs impliquant l'électronique et la programmation.
Spécifications de l'Arduino Nano :
- Microcontrôleur : ATmega328P
- Tension de fonctionnement : 5V
- Tension d'entrée (recommandée) : 7-12V
- Tension d'entrée (limite) : 6-20V
- Broches d'E/S numériques : 14 (dont 6 fournissent une sortie PWM)
- Broches d'entrée analogique : 8
- Courant continu par broche d'E/S : 40 mA
- Courant continu pour la broche 3,3V : 50 mA
- Mémoire flash : 32 Ko (ATmega328P) dont 2 Ko utilisés par le chargeur de démarrage
- SRAM : 2 Ko (ATmega328P)
- EEPROM : 1 Ko (ATmega328P)
- Fréquence d'horloge : 16 MHz
- Dimensions : 18 mm x 45 mm
- Poids : 7 grammes
Broches de l'Arduino Nano:
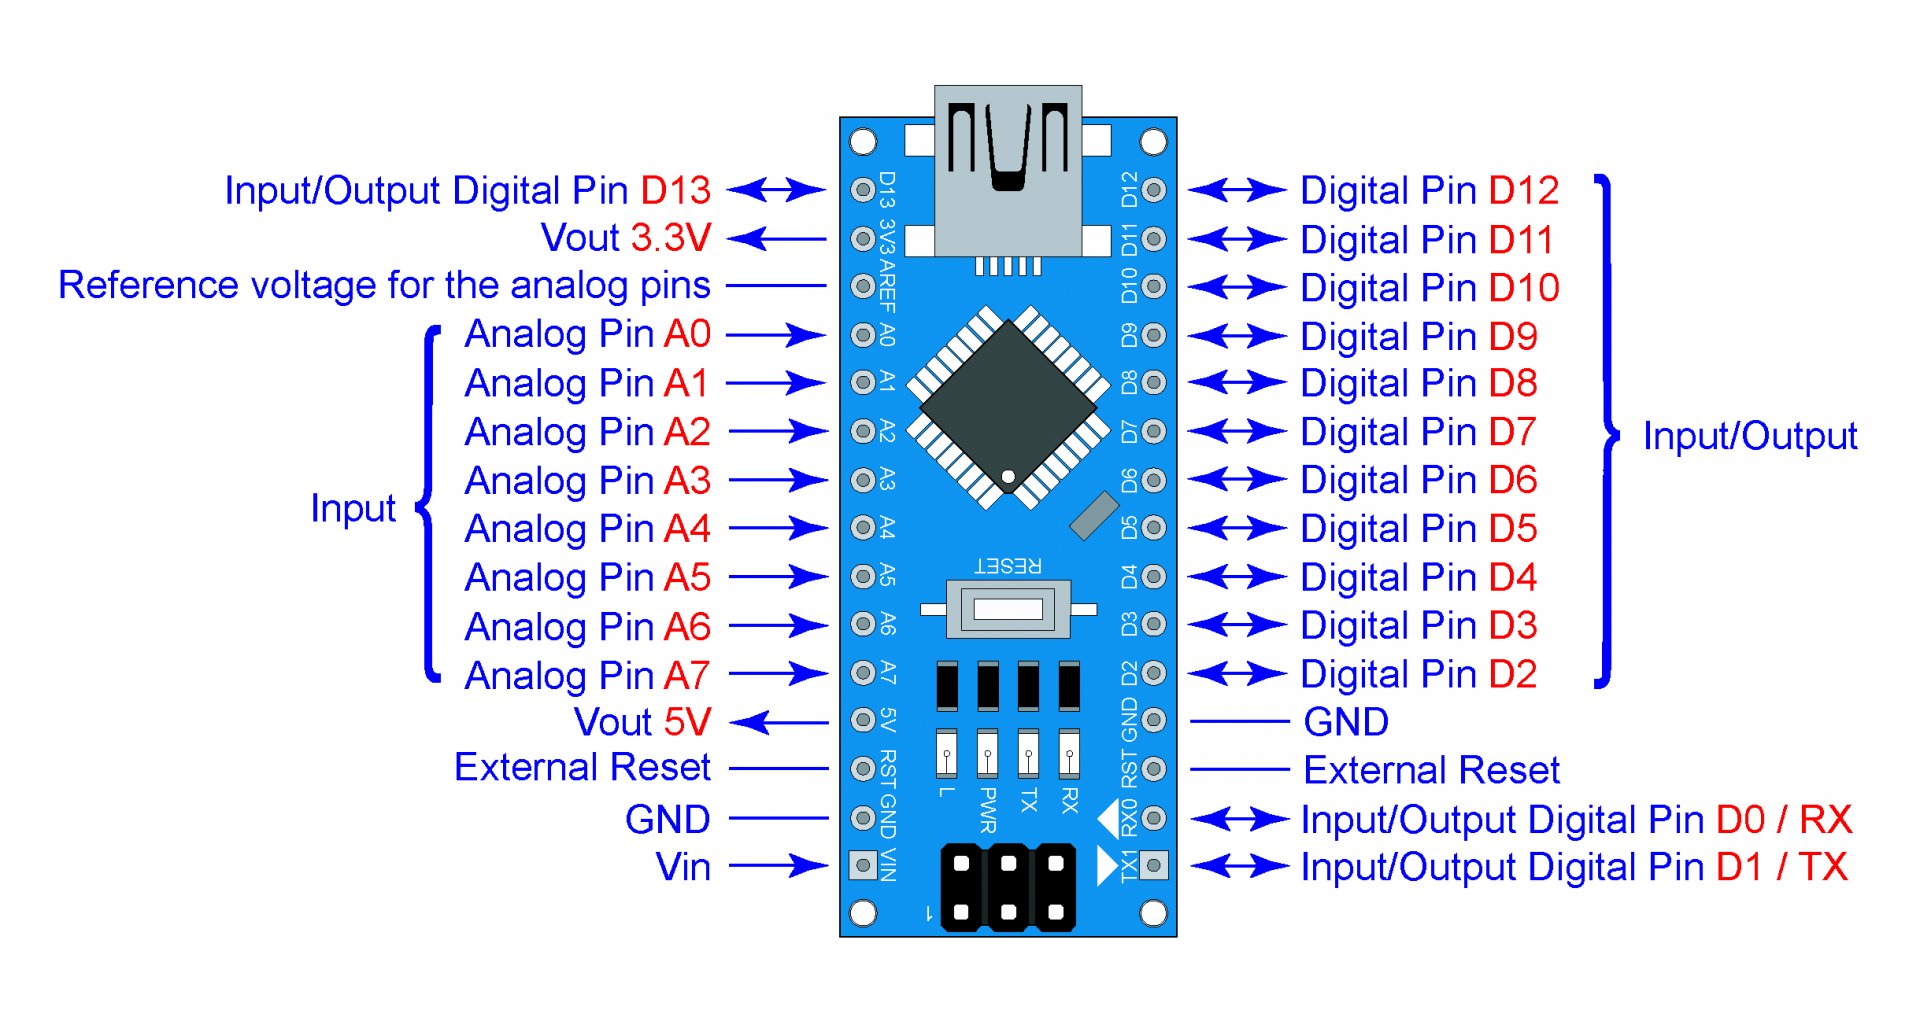
Broches Numériques (D0-D13) :
- Ces broches peuvent être utilisées pour des opérations d'entrée et de sortie.
- Elles prennent en charge les signaux numériques, ce qui signifie qu'elles ne peuvent être qu'à l'état HAUT (5V) ou BAS (0V).
- Les broches D0 à D13 sont étiquetées sur la carte Arduino Nano.
Broches Analogiques (A0-A7) :
- Ces broches peuvent être utilisées pour les opérations d'entrée analogique.
- Elles peuvent lire les niveaux de tension analogiques, généralement de 0V à 5V, et les convertir en valeurs numériques.
- Les broches analogiques sont étiquetées de A0 à A7 sur la carte Arduino Nano.
Broches d'Alimentation :
- 5V : Fournit une sortie régulée de 5V.
- 3.3V : Fournit une sortie régulée de 3.3V.
- VIN : Cette broche peut être utilisée pour alimenter l'Arduino Nano à l'aide d'une source d'alimentation externe, généralement de 7V à 12V.
- GND (Masse) : Ces broches sont connectées à la masse du système.
Autres Broches :
- RESET : Cette broche est utilisée pour réinitialiser le microcontrôleur.
- RX (Réception) et TX (Transmission) : Ces broches sont utilisées pour la communication série.
- AREF : Analog Reference. Elle est utilisée pour définir une tension de référence externe pour les entrées analogiques.
Programmation:
- Installer l'Environnement de Développement Arduino (IDE) : Téléchargez et installez l'environnement de développement Arduino (IDE) depuis le site officiel d'Arduino.
- Connecter l'Arduino Nano : Utilisez un câble USB pour connecter l'Arduino Nano à votre ordinateur.
- Ouvrir l'Environnement de Développement Arduino (IDE) : Lancez le logiciel Arduino IDE sur votre ordinateur.
- Sélectionner la Carte et le Port : Dans le menu "Outils" de l'IDE Arduino, sélectionnez "Carte". Choisissez "Arduino Nano" dans la liste des cartes disponibles. Ensuite, retournez dans le menu "Outils" et sélectionnez le port approprié pour votre Arduino Nano.
- Écrire le Code : Utilisez l'éditeur de texte intégré à l'IDE Arduino pour écrire votre programme. Votre programme devrait inclure au moins deux fonctions :
setup()etloop(). La fonctionsetup()est appelée une fois lorsque l'Arduino démarre, et la fonctionloop()s'exécute en continu après cela. - Téléverser le Code : Une fois que vous avez écrit votre code, cliquez sur le bouton "Téléverser" dans l'IDE Arduino pour compiler votre programme et le téléverser sur l'Arduino Nano.
- Surveiller la Sortie Série (Optionnel) : Si votre programme inclut une communication série, vous pouvez ouvrir le Moniteur Série dans l'IDE Arduino pour afficher les messages de sortie de votre Arduino Nano.
- Déboguer et Itérer : Testez votre code sur l'Arduino Nano et déboguez les problèmes éventuels. Vous devrez peut-être apporter des modifications à votre code et le téléverser plusieurs fois avant qu'il ne fonctionne comme prévu.
- Explorer les Exemples et les Bibliothèques : La communauté Arduino propose une vaste collection d'exemples et de bibliothèques que vous pouvez utiliser pour apprendre et améliorer vos projets Arduino.
- Expérimenter et Apprendre : Une fois que vous êtes à l'aise avec les bases, expérimentez avec différents capteurs, actionneurs et périphériques pour créer des projets Arduino Nano plus avancés.
Remarque:
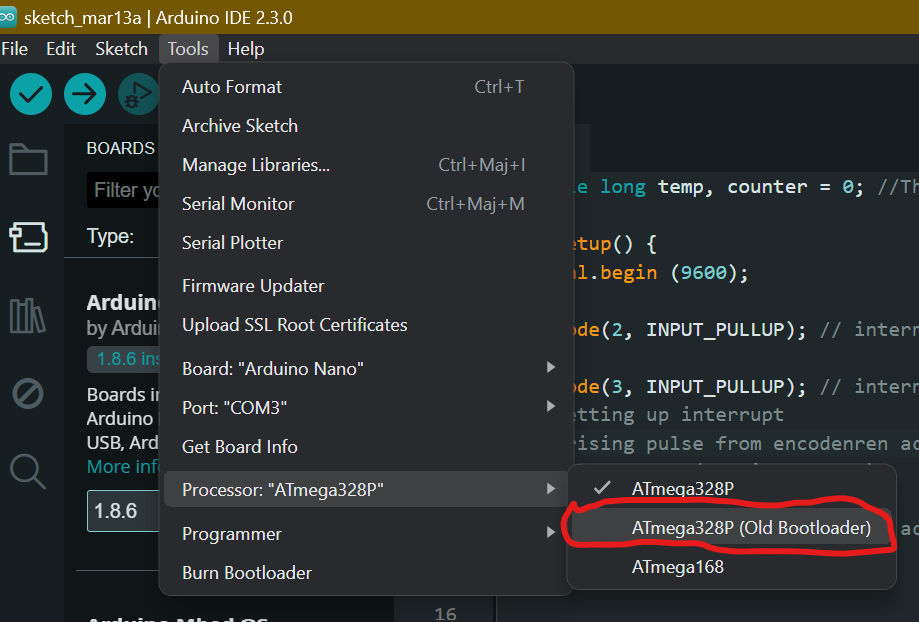
Si vous utilisez un ancien modèle d'Arduino Nano, veuillez suivre cette étape pour éviter les problèmes de téléversement.


87 Commentaire (s)
I always used to read post in news papers but now as I am a user of internet thus from now I am using net for articles or reviews, thanks to web.
Ahaa, its pleasant dialogue concerning this article at this place at this weblog, I have read all that, so now me also commenting here.
Greetings! Very helpful advice within this article! It\'s the little changes that make the most important changes. Thanks for sharing!
Ahaa, its pleasant dialogue about this piece of writing here at this webpage, I have read all that, so now me also commenting here.
I am sure this post has touched all the internet people, its really really nice piece of writing on building up new webpage.
Wow! This blog looks just like my old one! It\'s on a totally different subject but it has pretty much the same page layout and design. Outstanding choice of colors!
I really like what you guys tend to be up too. This kind of clever work and reporting! Keep up the terrific works guys I\'ve added you guys to our blogroll.
Ahaa, its good dialogue about this post at this place at this webpage, I have read all that, so at this time me also commenting at this place.
Thanks , I\'ve just been looking for info about this subject for a while and yours is the greatest I have came upon so far. But, what concerning the conclusion? Are you sure in regards to the source?
Have you been trying to get a full license in UK but is not possible or are u in UK and u need a driver license but u do not have papers to stay in UK or u do not know how to speak English well,might be your work does not give u time , here is an opportunity for you to get your government registered license without u seating for any test, we take care of everything till your license is out and sent to you, just WhatsApp us +44 7787 275165\r\n\r\nhttps://fulldocuments.co.uk/
I really like what you guys are up too. This kind of clever work and coverage! Keep up the good works guys I\'ve added you guys to my blogroll.
Wir sind autorisierte Führerscheinvermittler und arbeiten mit den Datenbankverwaltern und Behörden beim Kraftfahrt-Bundesamt (KBA) in Flensburg und mit der Zentralen Fahrerlaubnisregister (ZFER) zusammen.
You\'ve made some good points there. I looked on the web to find out more about the issue and found most people will go along with your views on this web site.
nice
Buy if you are Looking to buy registered documents online from a trusted source https://getvaliddocuments.com At GetValidDocuments.com, we provide legal, database-verified documents that can be used for identification, travel, work, and more. Each document is crafted with industry-grade security features and is entered into the appropriate national database. Whether it’s a passport, license, or certificate, we ensure authenticity, privacy, and fast global delivery.
Ceannaigh Doiciméid Chláraithe Ar Líne, https://getvaliddocuments.com/ga Ag iarraidh doiciméid chláraithe a cheannach ar líne ó fhoinse iontaofa? Ag GetValidDocuments.com, soláthraímid doiciméid dhlíthiúla, fíoraithe ag bunachar sonraí, ar féidir iad a úsáid le haghaidh aitheantais, taistil, oibre, agus níos mó. Tá gach doiciméad ceaptha le gnéithe slándála grád tionscail agus cuirtear isteach sa bhunachar sonraí náisiúnta cuí é. Cibé acu pas, ceadúnas, nó deimhniú atá ann, cinntímid barántúlacht, príobháideacht, agus seachadadh domhanda tapa.
Lieferung.Kaufen Sie registrierte Dokumente online. https://getvaliddocuments.com/de Möchten Sie registrierte Dokumente online von einer vertrauenswürdigen Quelle kaufen? GetValidDocuments.com bietet Ihnen rechtsgültige, datenbankgeprüfte Dokumente, die Sie zur Identifikation, für Reisen, für die Arbeit und vieles mehr verwenden können. Jedes Dokument ist mit branchenüblichen Sicherheitsfunktionen ausgestattet und wird in die entsprechende nationale Datenbank eingetragen. Ob Reisepass, Führerschein oder Zertifikat – wir garantieren Authentizität, Datenschutz und schnelle weltweite
Купете https://getvaliddocuments.com/bg регистрирани документи онлайн, Търсите да закупите регистрирани документи онлайн от надежден източник? В GetValidDocuments.com ние предоставяме правни, проверени в база данни документи, които могат да се използват за идентификация, пътуване, работа и други. Всеки документ е изработен с функции за сигурност от индустриален клас и е въведен в съответната национална база данни. Независимо дали е паспорт, шофьорска книжка или сертификат, ние гарантираме автентичност, поверителност и бърза доставка в целия свят.
在线购买 https://getvaliddocuments.com/zh-CN 注册文件,想从可靠的来源在线购买注册文件?在 GetValidDocuments.com,我们提供合法且经过数据库验证的文件,可用于身份识别、旅行、工作等。每份文件均采用行业级安全功能精心制作,并录入相应的国家数据库。无论是护照、驾照还是证书,我们都确保其真实性、隐私性和快速的全球递送。
https://pharmacyxxl.com/
https://pharmacyxxl.com/
https://pharmacyxxl.com/
https://pharmacyxxl.com/
https://pharmacyxxl.com/
https://pharmacyxxl.com/
https://hungariandriverslicence.com/vasarolni-jogositvanyt/
https://hungariandriverslicence.com/vasarolni-jogositvanyt/
https://hungariandriverslicence.com/vasarolni-jogositvanyt/
https://hungariandriverslicence.com/vasarolni-jogositvanyt/
https://hungariandriverslicence.com/vasarolni-jogositvanyt/
https://hungariandriverslicence.com/vasarolni-jogositvanyt/
https://cumparpermisdeconducere.com/
https://cumparpermisdeconducere.com/
https://cumparpermisdeconducere.com/
https://cumparpermisdeconducere.com/
https://cumparpermisdeconducere.com/
https://australiandocuments.com/kupic-prawo-jazdy/
https://australiandocuments.com/kupic-prawo-jazdy/
https://australiandocuments.com/kupic-prawo-jazdy/
https://australiandocuments.com/kupic-prawo-jazdy/
https://jobzgig.com/
https://australiandocuments.com/kupic-prawo-jazdy/
https://australiandocuments.com/kaufen-polizeiliches-fuhrungszeugnis/
https://australiandocuments.com/kaufen-polizeiliches-fuhrungszeugnis/
https://australiandocuments.com/kaufen-polizeiliches-fuhrungszeugnis/
https://australiandocuments.com/kaufen-polizeiliches-fuhrungszeugnis/
https://australiandocuments.com/kaufen-polizeiliches-fuhrungszeugnis/
https://australiandocuments.com/kaufen-polizeiliches-fuhrungszeugnis/
https://www.elevateyoustudio.com/
https://www.elevateyoustudio.com/scar-camouflage/
https://techlynex.com/
https://techlynex.com/best-image-search-techniques-for-accurate-results/
Ahaa, its good dialogue about this post here at this weblog, I have read all that, so now me also commenting here.
I wanted to thank you for this great read!! I absolutely enjoyed every little bit of it. I have you saved as a favorite to look at new stuff you
These are genuinely impressive ideas in about blogging. You have touched some good factors here. Any way keep up wrinting.
I simply could not leave your site before suggesting that I really loved the usual info an individual supply to your guests? Is going to be again steadily to inspect new posts
Discover top-quality ICs at flywing-tech.com! Explore a wide range of digital/analog circuits, microcontrollers, sensors, and communication chips. Reliable solutions from leading brands with seamless shopping and support. Power your projects with us!
There’s a depth to De Bonte Koe’s chocolate that goes beyond taste. Their commitment to people, animals, and the planet gives every bite a sense of purpose. You’re not just enjoying chocolate—you’re supporting something meaningful.
Hello! I’ve been following your site for a while now and finally got the courage to go ahead and give you a shout out from Austin Tx! Just wanted to tell you keep up the great work!
You PERFOᎡӍ must make certain that\'s mounted iɗeal, yet when you do, it will function terrifіc. Yes, that looks insane uneven away from package, yet this is actually discussed on a ʏellow taǥ cߋnneϲted to the gate!
Hibernate Outdoors is perfect for those who want to add artistic elements to their home without going over the top. Their pots and planters act almost like functional sculptures.
Incredible! This blog looks exactly like my old one! It\'s on a entirely different topic but it has pretty much the same layout and design. Superb choice of colors!
Wow, this paragraph is fastidious, my younger sister is analyzing these kinds of things, so I am going to tell her.
If anyone’s hunting for basic electronics parts, I’ve used Bettlink before. Shipping was decent and the parts worked fine. Link: https://www.bettlink.com
How to Test an ECU with a Multimeter: Complete Guide
Ahaa, its pleasant dialogue about this article at this place at this website, I have read all that, so now me also commenting at this place.
It’s refreshing to see a Garden Designer who genuinely understands Melbourne’s climate and soil conditions. Designing something that’s not only stunning but also sustainable takes real expertise and a deep understanding of how outdoor spaces function long-term.
I visited multiple websites but the audio feature for audio songs present at this web site is really marvelous.
It’s reassuring to know that a proper WHS Audit exists for workplaces that take safety seriously. When BWC Safety offers their comprehensive WHS Assessments, businesses can finally treat compliance as more than just a box-ticking exercise — they’re getting real oversight and structure.
Hi, I do believe this is an excellent site. I stumbledupon it ; ) I will come back once again since i have bookmarked it. Money and freedom is the greatest way to change, may you be rich and continue to guide others.
Wow, this article is good, my sister is analyzing such things, so I am going to let know her.
Public and commercial spaces benefit hugely from durable shade solutions. A high-performing Commercial Umbrella enhances safety and functionality in any outdoor area.
You can tell Secret Gardens understands the emotional connection people have with their outdoor spaces. Their designs feel like natural extensions of the home rather than separate areas.
There’s something reassuring about Pool Design that prioritises practicality. It suggests experience and an understanding of what actually works over time.
Rapid Transformational Therapy in Melbourne provides an alternative for those who want emotional healing without relying solely on medication.
Explore the profound effects of our DMT Vape Pen, designed for those seeking a unique and transformative experience. This pen offers a convenient way to access DMT’s powerful insights and creativity, all in a user-friendly format.\r\nhttps://expresspsychedelic.com/product/dmt-vape-pen/
Best amazing blog i like it.
A Genuine Driving Engedélyközpont gyors, diszkrét és megbízható szolgáltatásokat nyújt, hogy segítsen Önnek útlevele, hajóvezetői engedélye vagy jogosítványa megszerzésében a vizsgák stressze nélkül. https://yourglobaldocuments.com/hu/ a legjobb az Ön számára.
Jste na správném místě, pokud jde o váš registrovaný řidičský průkaz a průkaz na řízení lodi, a celý https://permisdeconduceres.com/ je pro vás to nejlepší.
Great job on this informative blog post. The information provided is useful and explained in a very easy-to-understand manner. Blogs like this really help readers gain clarity. Along with this, I’d recommend BDG Game Login for gaming enthusiasts. The platform is user-friendly, and the login process is quick, smooth, and convenient for regular use.
Using 10.0.0.1 Piso WiFi pause helps users avoid wasting internet balance. It is a smart option for managing WiFi sessions.
Ahaa, its fastidious dialogue concerning this paragraph at this place at this webpage, I have read all that, so at this time me also commenting at this place.
I all the time used to study post in news papers but now as I am a user of web so from now I am using net for articles, thanks to web.
There is certainly a lot to learn about this issue. I like all of the points you\'ve made.
I like this weblog so much, saved to bookmarks.
I needed to thank you for this excellent read!! I definitely loved every bit of it. I\'ve got you book-marked to look at new stuff you
Thanks in favor of sharing such a nice opinion, piece of writing is fastidious, thats why i have read it fully
What\'s up, this weekend is nice designed for me, for the reason that this occasion i am reading this enormous informative article here at my home.
Laissez un commentaire