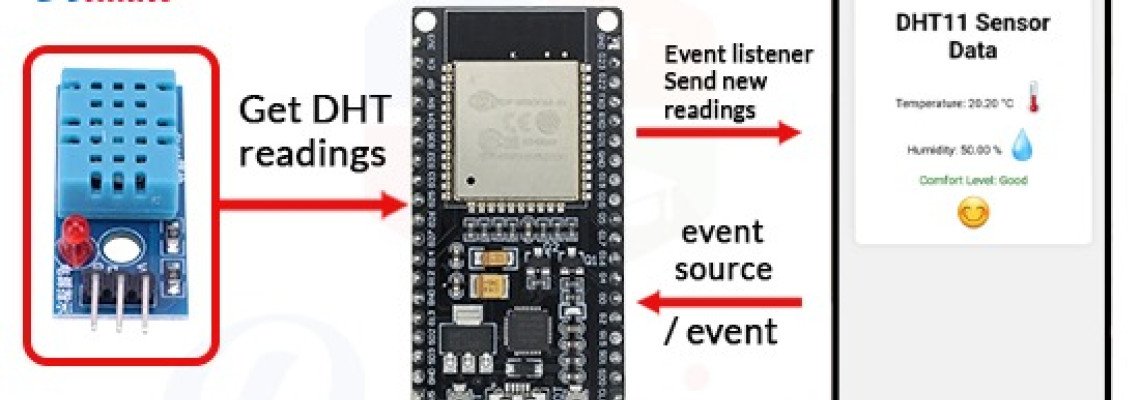
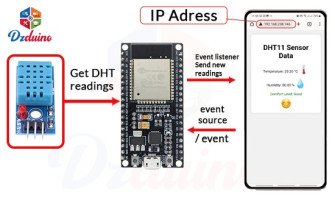
Dans ce tutoriel, nous allons construire un serveur Web pour l'humidité et la température avec le capteur DHT11 et l'ESP32.
Le DHT11 est un capteur basique et abordable de température et d'humidité, demeurant un choix populaire pour des projets où un capteur simple et abordable est suffisant pour la tâche à accomplir.
Composants nécessaires:
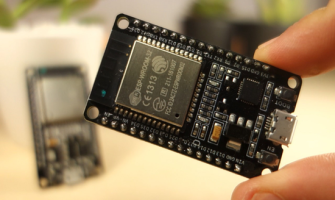
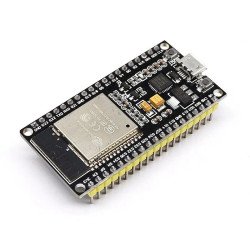
- ESP32
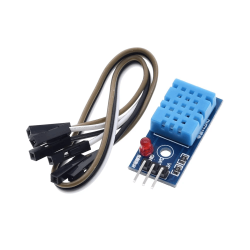
- Capteur d'humidité et de température DHT11
Caractéristiques du capteur DHT11:
Le capteur DHT11 est un capteur de température et d'humidité numérique basique et abordable. Voici les principales caractéristiques du capteur DHT11 :
1.Mesure combinée de la température et de l'humidité :
Le capteur DHT11 fournit à la fois des mesures de température et d'humidité dans un seul dispositif.
2.Sortie numérique :
Le capteur produit une sortie numérique, facilitant son interface avec des microcontrôleurs sans nécessiter de conversion analogique-numérique.
3.Coût bas :
Un des principaux avantages du DHT11 est son coût bas, le rendant accessible pour une large gamme d'applications, notamment dans des projets éducatifs et de loisirs.
4.Interface simple :
Le capteur nécessite un nombre minimal de composants externes et possède une interface simple, impliquant généralement seulement trois fils (alimentation, terre et signal).
5.Plage de tension de fonctionnement étendue :
Le DHT11 fonctionne dans une plage de tension étendue, généralement de 3,3V à 5V, ce qui le rend compatible avec des plates-formes de microcontrôleurs courantes telles qu'Arduino.
6.Précision modérée :
Bien qu'il ne soit pas aussi précis que certains capteurs haut de gamme, le DHT11 fournit des mesures de température et d'humidité raisonnablement précises pour de nombreuses applications. La précision de la température est de ±2°C et celle de l'humidité est de ±5%.
7.Élément résistif d'humidité :
Le DHT11 utilise un élément résistif d'humidité pour mesurer les niveaux d'humidité. Cet élément change sa résistance en fonction de l'humidité de l'air.
8.Thermistance pour la mesure de la température :
La mesure de la température dans le DHT11 est réalisée à l'aide d'une thermistance, qui change sa résistance avec la température.
9.Taux d'échantillonnage lent :
Le DHT11 a généralement un taux d'échantillonnage lent, d'environ 1 Hz, ce qui signifie qu'il fournit un nouvel ensemble de données environ une fois par seconde.
10.Conception compacte :
Le capteur est logé dans un petit boîtier en plastique noir avec quatre broches pour une connexion facile.
11.Protocole de communication limité :
Le DHT11 utilise un protocole de communication simple et propriétaire pour transmettre des données aux microcontrôleurs.
12.Adapté aux applications de base :
Le DHT11 convient bien aux applications de base telles que l'automatisation résidentielle, la surveillance météorologique et les projets éducatifs où une précision modérée est acceptable.
13.Support de la communauté :
En raison de sa popularité, le DHT11 est bien pris en charge dans la communauté des fabricants, et des bibliothèques sont disponibles pour diverses plates-formes de microcontrôleurs.
Bien que le DHT11 ne convienne pas aux applications nécessitant une grande précision, sa simplicité et son abordabilité en font un choix populaire pour des projets introductifs et des applications où des mesures de température et d'humidité de base sont suffisantes.
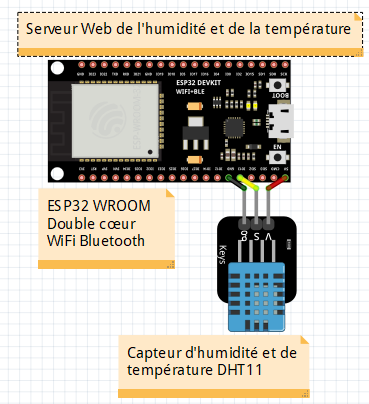
Schémas :
Programme:
#include <WiFi.h> // Bibliothèque WiFi
#include <ESPAsyncWebServer.h> // Bibliothèque du serveur Web asynchrone
#include <Adafruit_Sensor.h> // Bibliothèque de capteurs Adafruit (bibliothèque DH11)
#include <DHT.h> // Bibliothèque DH11
const char* ssid = "Sino"; // Mettez le nom de votre réseau WiFi
const char* password = "123456789"; // Mettez votre mot de passe WiFi
const int dhtPin = 4; // Broche connectée au capteur DH11
// Code HTML de la page Web
const char* htmlPage = R"(
<!DOCTYPE html>
<html lang="fr">
<head>
<meta charset="UTF-8">
<meta name="viewport" content="width=device-width, initial-scale=1.0">
<title>Données du capteur DH11</title>
<style>
body {
font-family: Arial, sans-serif;
text-align: center;
background-color: #f0f0f0;
margin: 0;
padding: 20px;
}
#sensorData {
background-color: #ffffff;
padding: 20px;
border-radius: 10px;
box-shadow: 0 0 10px rgba(0, 0, 0, 0.1);
}
.wifi-icon, .temperature-icon, .humidity-icon {
font-size: 40px;
}
.comfort-level {
font-size: 24px;
margin-top: 10px;
}
.comfort-icon {
font-size: 40px;
margin-top: 10px;
}
.comfort-good {
color: green;
}
.comfort-moderate {
color: orange;
}
.comfort-poor {
color: red;
}
</style>
</head>
<body>
<div id="sensorData">
<h1>Données du capteur DH11</h1>
<p>Température : <span id="temperature">Chargement...</span> °C <span class="temperature-icon">????️</span></p>
<p>Humidité : <span id="humidity">Chargement...</span> % <span class="humidity-icon">????</span></p>
<div class="comfort-level" id="comfortLevel">Niveau de confort : Chargement...</div>
<div class="comfort-icon" id="comfortIcon"></div>
</div>
<script>
function updateData(data) {
document.getElementById('temperature').innerText = data.temperature;
document.getElementById('humidity').innerText = data.humidity;
// Mise à jour du texte du niveau de confort
const comfortLevelElement = document.getElementById('comfortLevel');
const comfortIconElement = document.getElementById('comfortIcon');
if (data.temperature >= 20 && data.temperature <= 25 && data.humidity >= 30 && data.humidity <= 60) {
comfortLevelElement.innerText = 'Niveau de confort : Bon';
comfortLevelElement.className = 'comfort-good';
comfortIconElement.innerText = '????';
} else if (data.temperature >= 18 && data.temperature <= 28 && data.humidity >= 20 && data.humidity <= 70) {
comfortLevelElement.innerText = 'Niveau de confort : Modéré';
comfortLevelElement.className = 'comfort-moderate';
comfortIconElement.innerText = '????';
} else {
comfortLevelElement.innerText = 'Niveau de confort : Médiocre';
comfortLevelElement.className = 'comfort-poor';
comfortIconElement.innerText = '????';
}
}
function fetchData() {
fetch('/data')
.then(response => response.json())
.then(data => updateData(data))
.catch(error => console.error('Erreur lors de la récupération des données :', error));
}
setInterval(fetchData, 2000);
fetchData(); // Récupération initiale lors du chargement de la page
</script>
</body>
</html>
)";
const int DHT_TYPE = DHT11;
DHT dht(dhtPin, DHT_TYPE);
AsyncWebServer server(80); // Le port par défaut pour la communication HTTP
void setup() {
Serial.begin(115200);
// Connexion au WiFi
WiFi.begin(ssid, password);
while (WiFi.status() != WL_CONNECTED) {
delay(1000);
Serial.println("Connexion au WiFi...");
}
Serial.println("Connecté au WiFi");
Serial.print("Adresse IP : ");
Serial.println(WiFi.localIP());
// Initialisation du capteur DH11
dht.begin();
// Servir la page HTML
server.on("/", HTTP_GET, [](AsyncWebServerRequest *request){
Serial.println("Servir la page HTML");
request->send(200, "text/html", htmlPage);
});
// Servir les données du capteur sous forme de JSON
server.on("/data", HTTP_GET, [](AsyncWebServerRequest *request){
Serial.println("Servir les données du capteur");
String temperature = String(dht.readTemperature());
String humidity = String(dht.readHumidity());
String json = "{\"temperature\":\"" + temperature + "\", \"humidity\":\"" + humidity + "\"}";
request->send(200, "application/json", json);
});
server.begin();
}
void loop() {
// Rien à faire ici
}
Resultat:
Après la connexion au wifi nous obtiendrons cette adresse ip
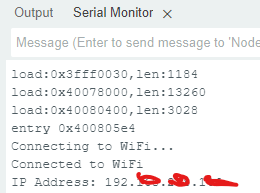
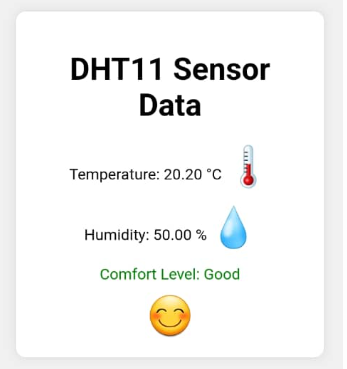
Mettez-le dans l'URL du navigateur Web (googlechrome, mozilafirefox, opera.... etc) et vous pourrez accéder à cette page



24 Commentaire (s)
bonjour\r\n n\'y connaissant en création de pages web j\'ai télécharge le programme qui fonctionne très bien pour l\'affichage des données du capteur dht11 par contre je me retrouve avec cet affichage \r\n c\'est fade par rapport au votre je n\'est pas le graphisme\r\n merci d\'avance pour votre analyse\r\n\r\n Température : 25.80 °C ????️\r\n Humidité : 31.00 % ????\r\n Niveau de confort : Modéré
What a material of un-ambiguity and preserveness of valuable experience on the topic of unpredicted feelings.
Ahaa, its pleasant conversation concerning this paragraph at this place at this webpage, I have read all that, so at this time me also commenting at this place.
Wow, this paragraph is nice, my younger sister is analyzing these kinds of things, so I am going to tell her.
Hello there! Do you know if they make any plugins to protect against hackers? I\'m kinda paranoid about losing everything I\'ve worked hard on. Any suggestions?
I really like it when folks come together and share views. Great website, keep it up!
I rattling glad to find this internet site on bing, just what I was looking for :D besides saved to fav.
I simply couldn\'t depart your website prior to suggesting that I extremely enjoyed the standard info an individual provide to your visitors? Is gonna be back frequently in order to investigate cross-check new posts
Hi! I\'ve been following your blog for a long time now and finally got the bravery to go ahead and give you a shout out from Austin Tx! Just wanted to say keep up the fantastic job!
So if you have the budget, present him a notebook or possibly a plasma Television as his birthday gifts.
Wow, this article is good, my younger sister is analyzing such things, therefore I am going to tell her.
Ahaa, its good dialogue about this article at this place at this blog, I have read all that, so at this time me also commenting here.
I visited various sites however the audio quality for audio songs present at this web page is really wonderful.
Ahaa, its pleasant conversation regarding this piece of writing here at this web site, I have read all that, so now me also commenting at this place.
It\'s very simple to find out any matter on net as compared to books, as I found this piece of writing at this web site.
Awesome! Its actually amazing piece of writing, I have got much clear idea concerning from this piece of writing.
I visited a lot of website but I conceive this one contains something special in it.
Hi, I do believe this is a great blog. I stumbledupon it ;) I am going to come back once again since i have saved as a favorite it. Money and freedom is the best way to change, may you be rich and continue to help others.
It\'s an remarkable piece of writing for all the internet users; they will get advantage from it I am sure.
Way cool! Some very valid points! I appreciate you writing this write-up and the rest of the website is really good.
I am sure this paragraph has touched all the internet users, its really really fastidious article on building up new webpage.
Greetings! Very helpful advice within this post! It is the little changes that make the biggest changes. Thanks a lot for sharing!
I’ll immediately clutch your rss as I can’t in finding your email subscription link or e-newsletter service. Do you have any? Kindly allow me understand so that I may subscribe. Thanks.
Enjoyed looking through this, very good stuff, thanks.
Laissez un commentaire