


À l'ère d'aujourd'hui, la technologie peut améliorer la vie humaine. La technologie évolue décennie après décennie. L'automatisation était une science-fiction plus tôt, mais pas aujourd'hui. En combinant les dernières technologies avec la maison, nous pouvons construire une maison impressionnante. Avec l'Arduino, nous pouvons construire un système domotique capable de faire fonctionner automatiquement les appareils domestiques. Commencer
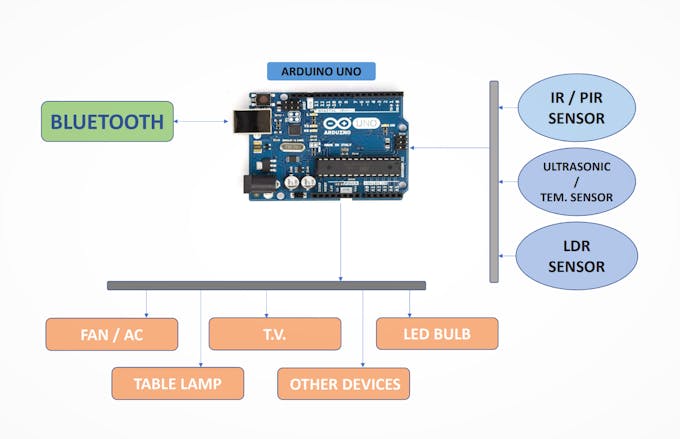
Avant de commencer le projet, comprenons d'abord les bases. Considérez l'image suivante (configuration globale):

Configuration pour la salle
Considérant maintenant le scénario de la pièce, un Arduino UNO contrôlera les appareils et lira les données des capteurs. La figure "Architecture de la pièce" illustre comment l'Arduino UNO se connecte aux appareils et aux capteurs. La pièce dispose de plusieurs appareils contrôlables (c'est-à-dire lumière (s), ventilateur, prise murale (s), etc.), un PassiveIR (pour détecter la présence humaine dans la pièce), un capteur de température (LM35 pour collecter la température ambiante) détecter l'intensité lumineuse près de la fenêtre de la pièce).
Scénario de salleSchémas pour 5 relais
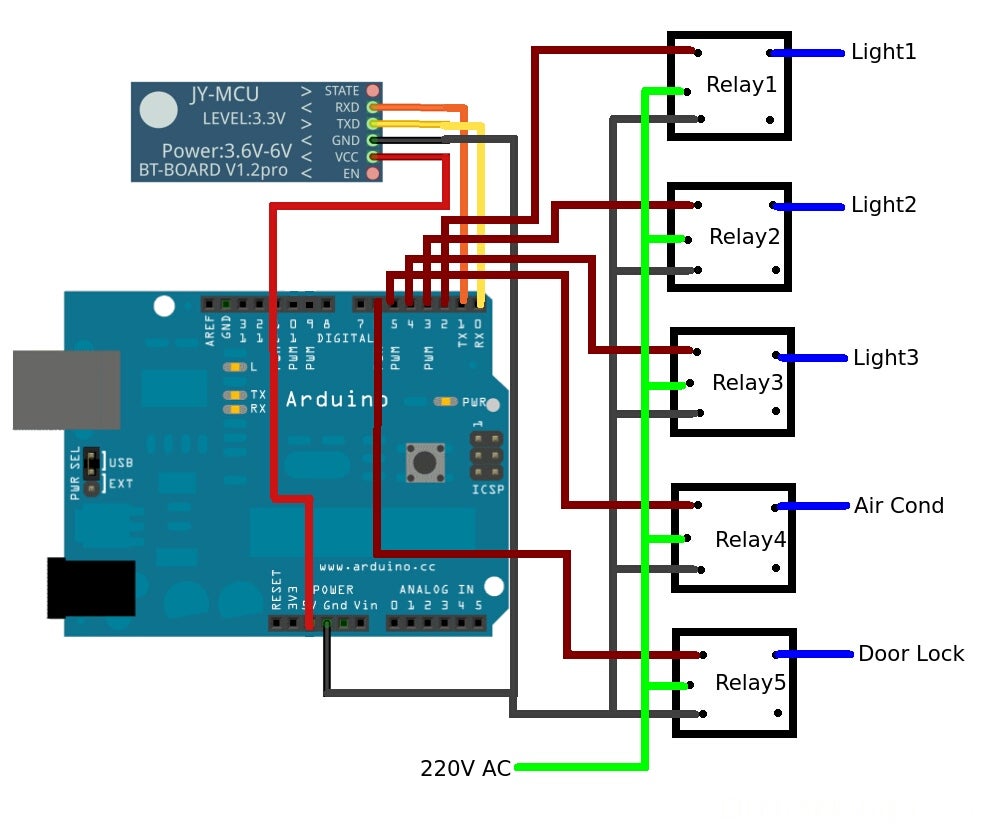
Assemblage du matériel
- Bluetooth TX pin to Arduino RX pin.
- Bluetooth RX pin to Arduino TX pin
- VCC pin to 5v GND to GND Arduino
- Relay IN1 pin to Arduino D2 (Digital Pin 2)
- Relay IN2pin to Arduino D3 (Digital Pin 3)
- Relay IN3 pin to Arduino D4 (Digital Pin 4)
- Relay IN4 pin to Arduino D5 (Digital Pin 5)
- Relay IN5 pin to Arduino D6 (Digital Pin 6)
Programmation de l'Arduino
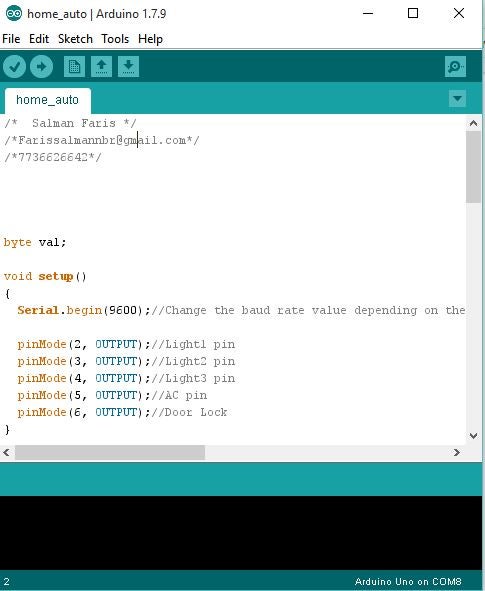
Code Arduino pour ce projet
byte val;
void setup()
{
Serial.begin(9600);//Change the baud rate value depending on the default baud rate of your bluetooth module, for Bluesmirf-115200 and for JY-MCU-9600
pinMode(2, OUTPUT);//Light1 pin
pinMode(3, OUTPUT);//Light2 pin
pinMode(4, OUTPUT);//Light3 pin
pinMode(5, OUTPUT);//AC pin
pinMode(6, OUTPUT);//Door Lock
}
void loop()
{
int a=0;
if(Serial.available())
{
val=Serial.read();
Serial.println(int(val));//Display received value on Serial Monitor
if(int(val)==49)//Turn Light1 ON
digitalWrite(2,HIGH);
else if (int(val)==50)//Turn Light1 OFF
digitalWrite(2,LOW);
if(int(val)==51)//Turn Light2 ON
digitalWrite(3,HIGH);
else if(int(val)==52)//Turn Light2 OFF
digitalWrite(3,LOW);
if(int(val)==53)//Turn Light3 ON
digitalWrite(4,HIGH);
else if(int(val)==54)//Turn Light3 OFF
digitalWrite(4,LOW);
if(int(val)==55)//Turn AC ON
digitalWrite(5,HIGH);
else if(int(val)==56)//Turn AC OFF
digitalWrite(5,LOW);
if(int(val)==57)//Lock the DOOR
digitalWrite(6,HIGH);
else if(int(val)==48)//Unlock the DOOR
digitalWrite(6,LOW);
}
}
Communication Bluetooth à l'aide d'une application
Installez l'application
Connectez Arduino à une batterie 9v ou à un ordinateur- Installez l'application sur votre téléphone
exécuter l'applicationautoriser les autorisations BTTapez le nom de votre module BT (normalement HC-05)Mot de passe = 1234paire ok
Lien de l'application : https://content.instructables.com/ORIG/F52/J9HK/INQBK82F/F52J9HKINQBK82F.apk
Produits connexes


Laissez un commentaire